Data Weekender is a free virtual conference that was born out of the global pandemic and is still going strong. I am super excited to be involved with it again. It’s run by a great group of folks that are super passionate about data, just like I am. There are tons of great sessions by some wonderful speakers, you can check out the schedule here.
I hope you’ll come join us, there’s still time to register. I’d love to see you there.
Lately, I’ve been having to create items in Power BI, that I haven’t had to do for a while, this week it was a Time table. Of course, I don’t do this often enough, so I had to search the dark corners of my mind, eventually gave up and used Google. I am documenting this here for my poor memory, but I figured it could probably help others as well, as I had to use a couple of articles to jog my memory. Now it’s all in one place for future reference. You’re welcome 😁
There are some instances when you want to analyze data over time, not just dates. Most of us are familiar with having to create date tables and use them in analysis, but having to analyze data over time is not as common. Let’s say you run a taxi company and you want to determine when your busiest times of day are. This would come in handy for scheduling drivers. You need more drivers during busy times because no one wants to wait for a taxi!
My example creates a time table down to the minute. You can definitely go more granular, but then you will end up with a time table with 86,400 rows (24 hrs * 60 mins * 60 secs) if you go down to the second. My time table will have 1440 rows (24 hrs * 60 mins).
Some might ask about creating this in Power Query using M. That is a perfectly valid approach, and I encourage it when you can, but you can’t always do that based on your data model data sources and storage modes, which is what I ran into this week. If you want to use Power Query to create your time table, check out this video by Wyn Hopkins on YouTube. He does a great job explaining it.
Now, on to the task at hand. Creating a time table using DAX. I do want to say that in order to use this time table for analysis, your data will need to have a column that can join to the time table. Because I am going down to the minute level, your data will have to have data at the minute level as well.
Here is the high level list of steps to create the time table, if this is enough for you, then you can stop reading now. However, if you want the details of each step, keep reading. I will also make all the DAX available via my github repo.
Create Transaction Time table
Add Time to the Minute column
Change Time to the Minute column data type to Time
Add time slot column
Change time slot column data type to Time
Repeat steps 4 & 5 until you have all the time slots you want
Step 1 – Create Transaction Time Table
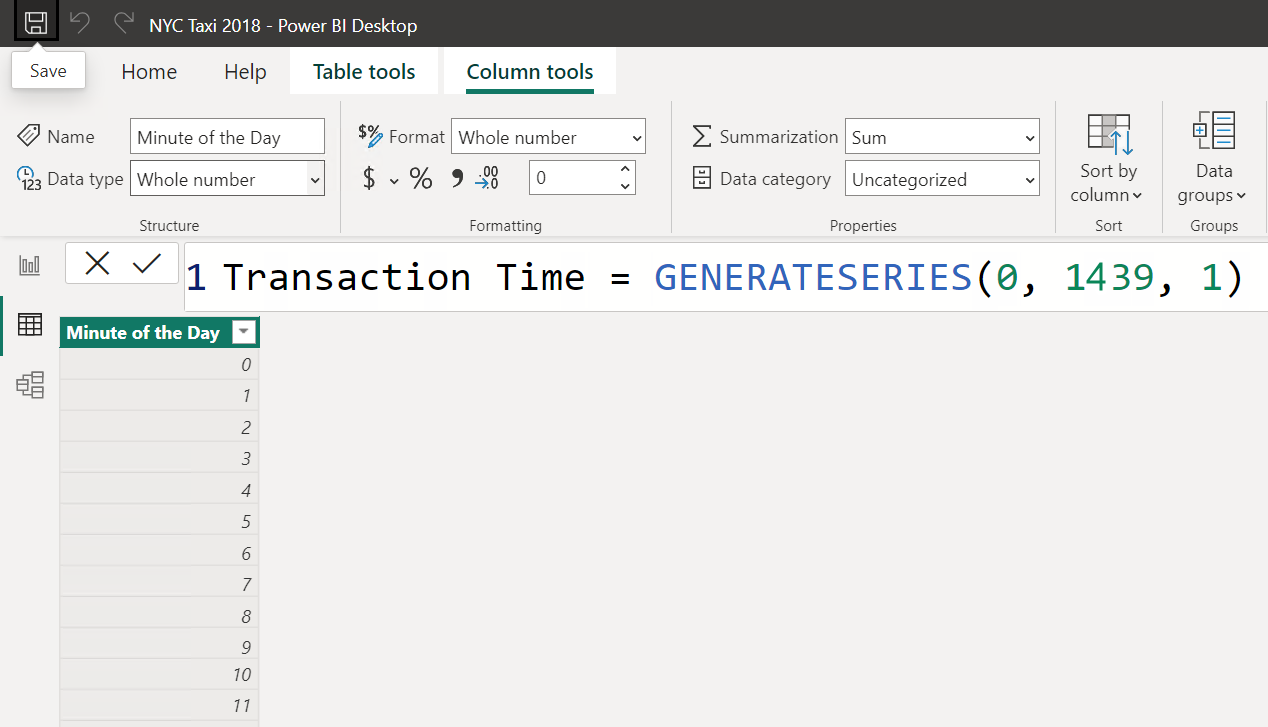
In your Power BI Desktop file, if you switch to the Data view tab on the left side, you will see the menu changes. From this new menu, select New table. You will be prompted to enter some DAX. I am using the GenerateSeries() function. The DAX for this step is
Transaction Time = GENERATESERIES(0, 1439, 1)
Now change the default column name to Minute of the Day. You’ll see a column of integers from 0 to 1439 for a total of 1,440 rows.
Step 2 – Add Time to the Minute column
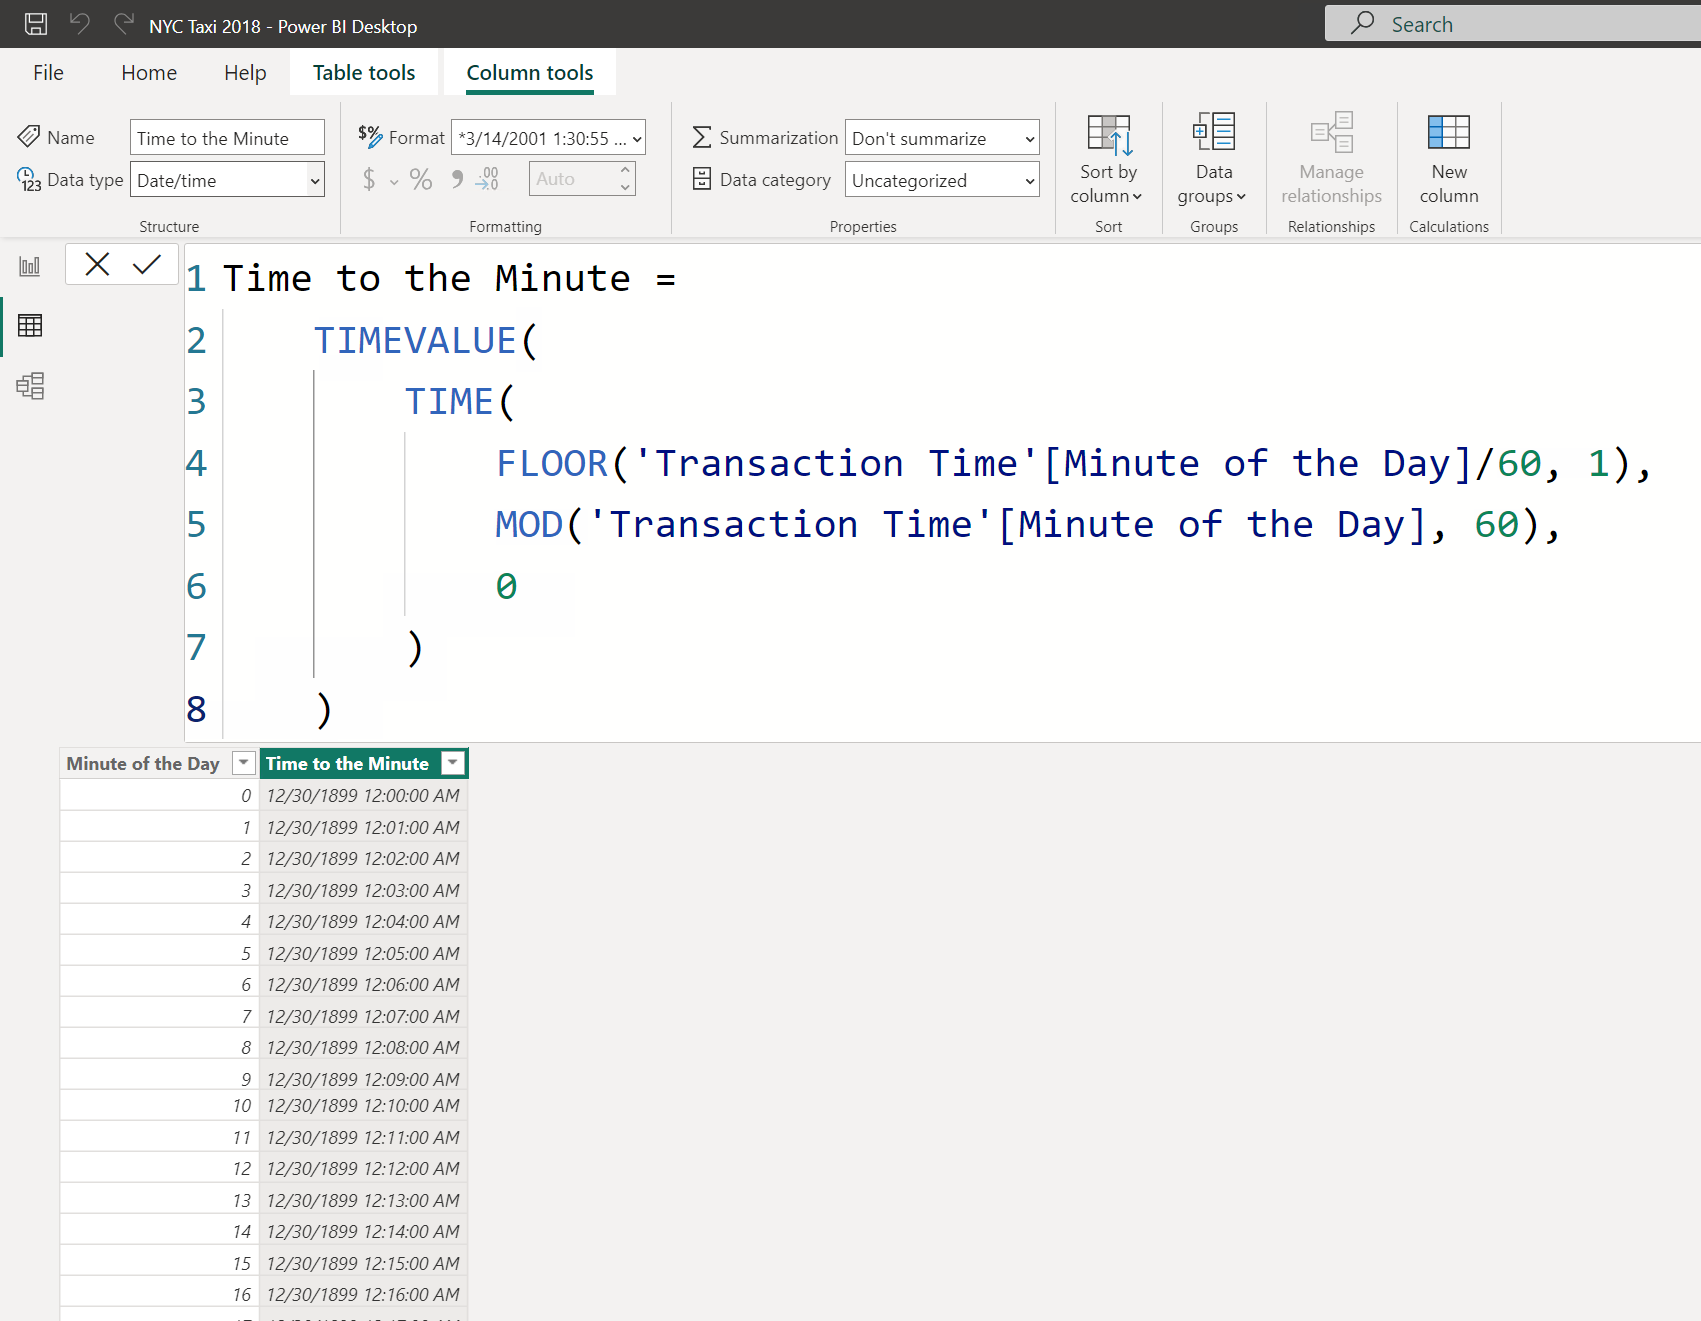
Now we need to turn the Minute of the Day column to an actual time, so we need to add a new column, Time to the Minute. The DAX for this uses a formula to convert the column Minute of the Day to a time value. The Time function takes 3 parameters, Hour, Minute, and Second, respectively. For the Hour, we use the FLOOR function to get the hour of the day by dividing the Minute of the Day by 60 (60 minutes in an hour). For the Minute, we use the MOD function to get the remainder of minutes when we divide by 60 (again, 60 minutes in an hour). For the Second, we use 0 since we are not going down to that granularity.
The DAX for this column is (apologies for the hideously formatted DAX)
Time to the Minute = TIMEVALUE( TIME( FLOOR(‘Transaction Time'[Minute of the Day]/60, 1), MOD(‘Transaction Time'[Minute of the Day], 60), 0 ) )
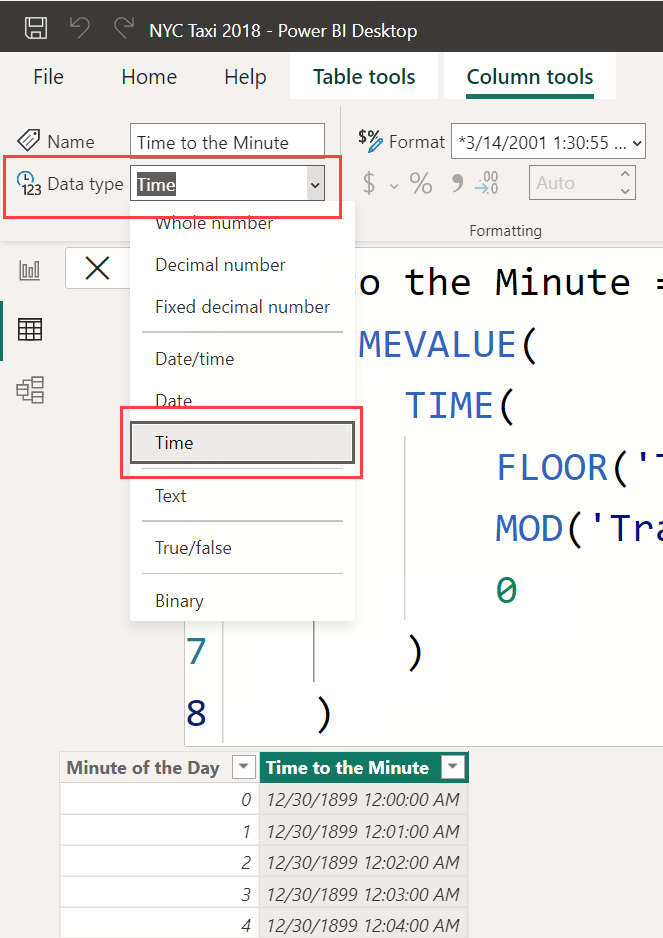
Step 3 – Change Time to the Minute column data type to Time
By default, our new Time to the Minute column was added as datetime data type. Not only that but the default date is 12/30/1899 – Yikes! We need to convert it to a Time data type. From the Data type dropdown, select Time.
and you can see that the date is no longer part of the column, we only have a time value now.
Step 4 – Add time slot column
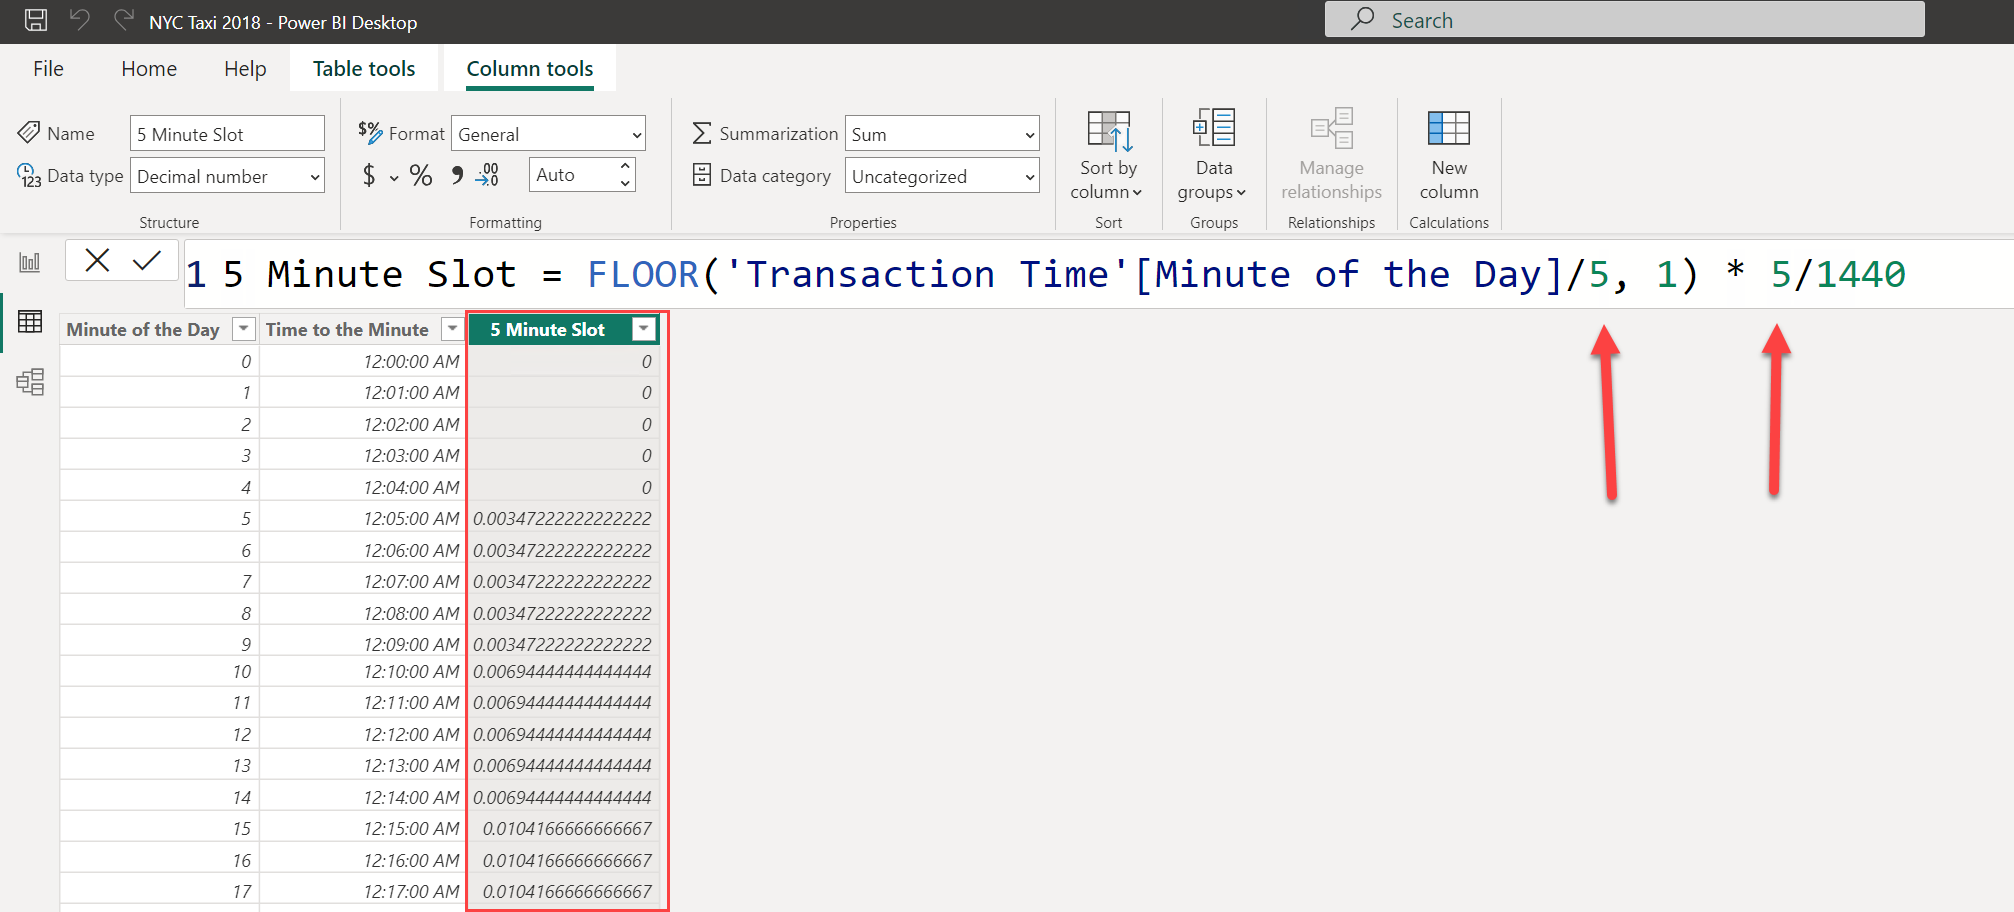
Now we need to create the time slot column(s) that we are going to use in our model. I’ll start with my generic DAX pattern of X minutes, then replace X with my value. Add a new column and use the following DAX for the column
X Minute Slot = FLOOR(‘Transaction Time'[Minute of the Day]/X, 1) * X/1440
I am going to need a 5 minute time slot, so I will replace all the X values with 5,
Step 5 – Change time slot column data type to Time
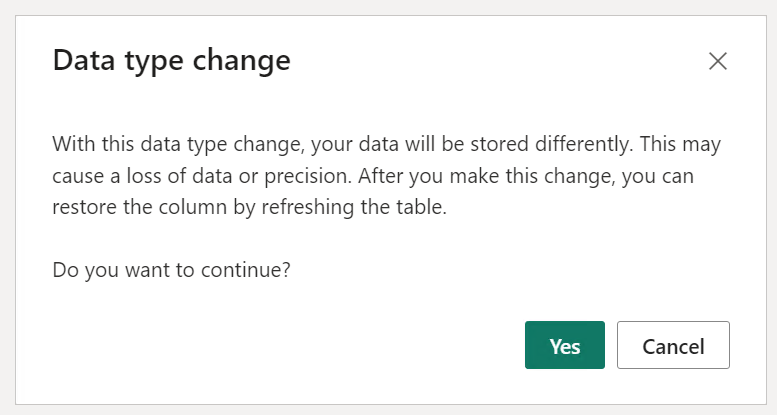
You’ll notice that we now have a decimal value for our 5 Minute Slot column. That’s not very helpful, so we need to change the data type to Time from the Data type dropdown.
You will get a prompt about Data type change. You will need to click Yes to change your new column to a Time data type.
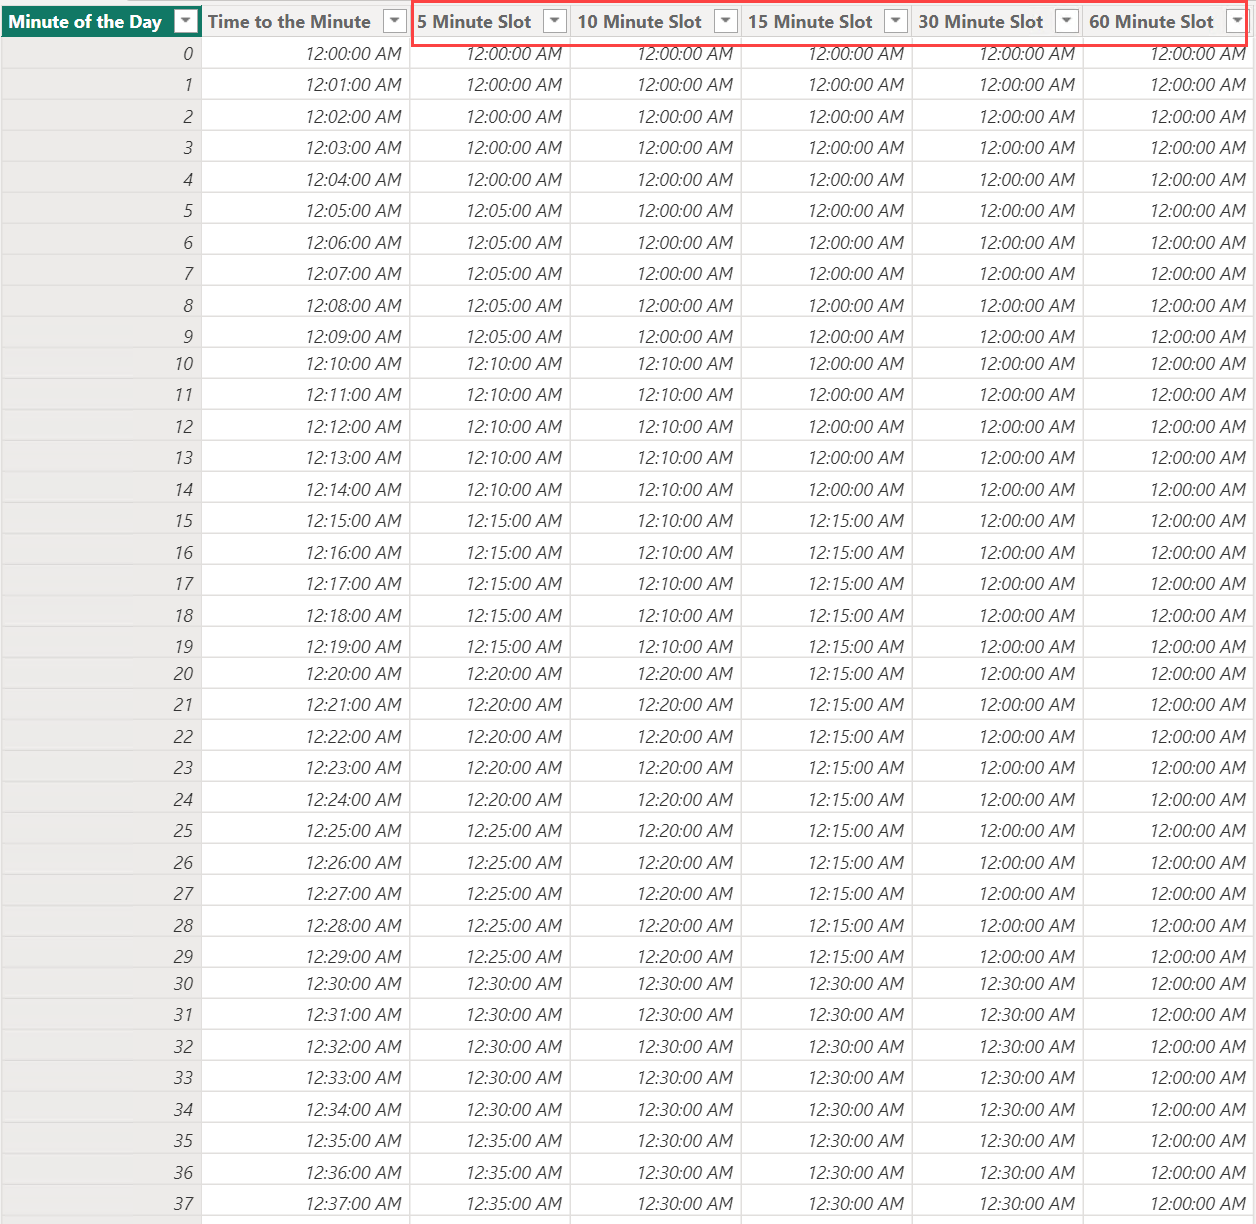
And now we have a lovely column of time values. Notice how the values repeat for every 5 rows, then change to the next time. This is because we used FLOOR function.
Step 6 – Repeat steps 4 & 5 until you have all the time slots you want
Now repeat steps 4 & 5 until you have all the time slot columns you want. Here is my time table with the final time slot columns.
I have 5, 10, 15, 30, and 60 minute slot columns.
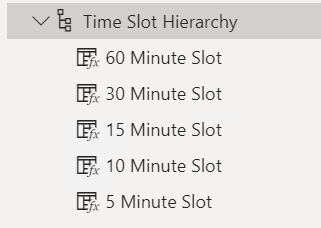
If you want to go the extra mile, you can create a hierarchy for the time slots, this is what mine looks like.
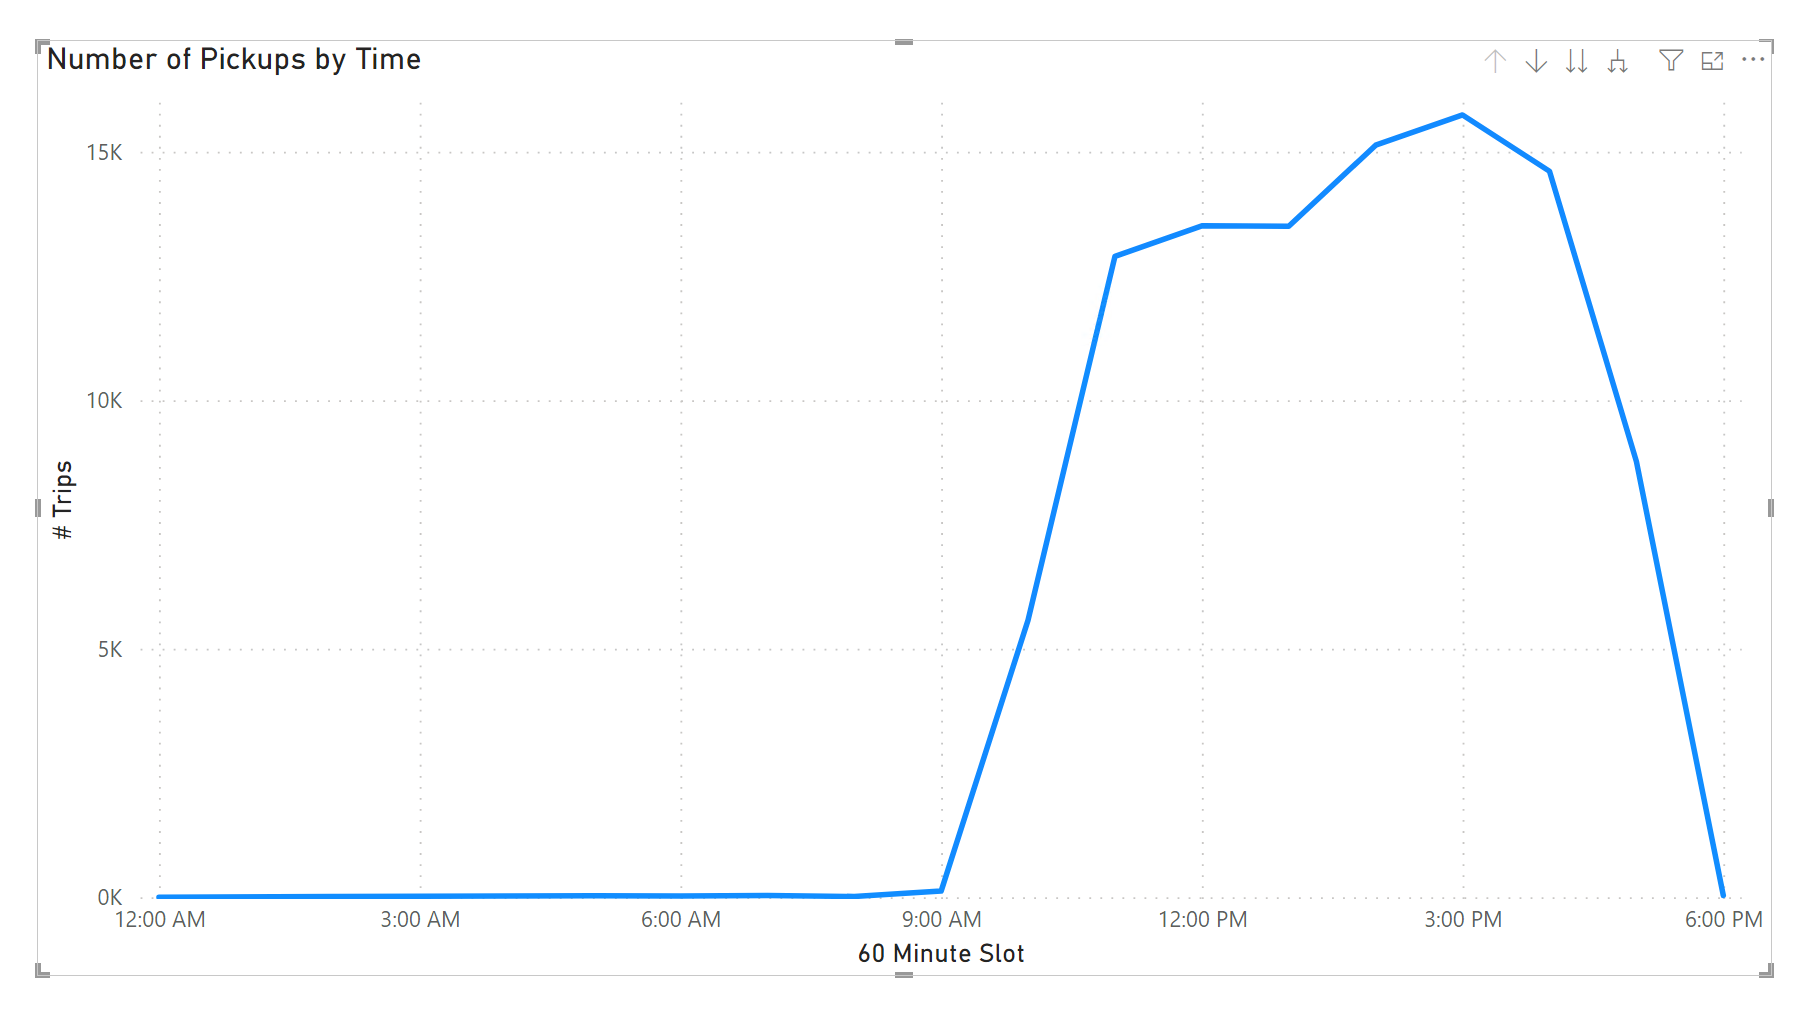
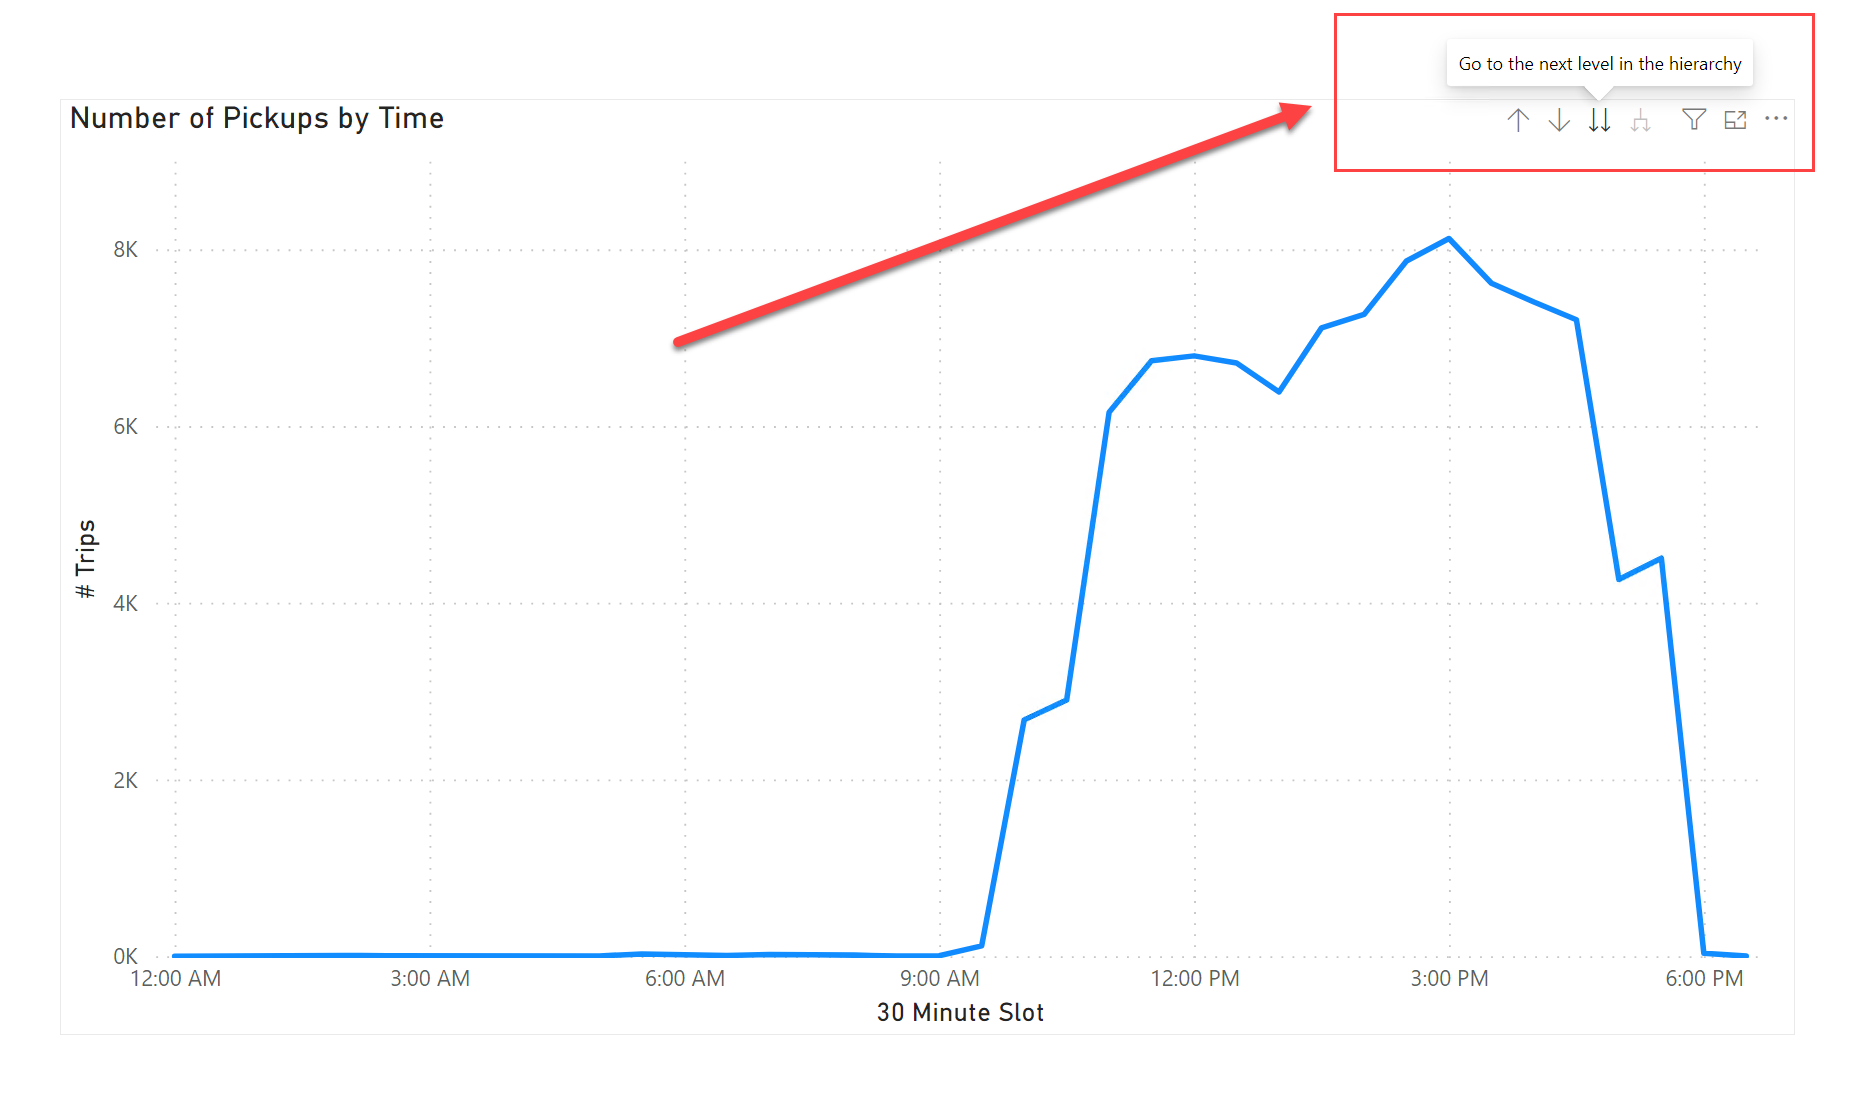
I know what you’re thinking, “How do I use this in a visual?”, well, I used a line chart to track the pickup of my taxis. It looks like this.
You can use the hierarchy to allow for better analysis, my only suggestion is to use the “go to next level” of drill down (the 2 arrows pointing down) instead of “expand to next level” (the forked down arrow) for a better experience.
That’s it, you now have a Time table and a hierarchy for better analysis over time.
In today’s world of wanting to automate everything, specifically, automating your CI/CD process for your Power BI datasets and dataset refreshes, you need to understand your options when it comes to the credentials you can use for your data sources.
If we are using enterprise-wide datasets, we don’t want Power BI datasets owned by individuals; we want them to be owned by a Service Principal so they aren’t relying on specific individuals when things go sideways (and because we all want to go on vacation at some point). However, it’s not always clear on what credentials will actually be used for our data sources in our datasets when using a Service Principal. In a previous post, I talked about how to set up a service principal to take over a dataset when using data gateways, but one of the pre-requisites I listed was that your data sources needed to be configured with appropriate credentials. That’s where this post comes in.
You essentially have three options for data source credentials, depending on your data source type.
Basic Authentication
Active Directory/Azure Active Directory Authentication
Service Principal
This post will help you understand these options and the pros/cons of each.
Basic Authentication
If you are using an on-prem data source like SQL Server or Oracle, basic authentication means you have a username and password that only exists within this data source and it’s up to the database engine to authenticate the user. In SQL Server it’s called SQL Authentication and in Oracle it’s called Local Authentication.
Pros
Super easy to set up
All your security is contained within the database itself
Almost all applications can use basic authentication
Cons
Passwords tend to get passed around like a penny in a fountain
On the opposite end of the spectrum from above, the password is sometimes tribal knowledge and not recorded anywhere, so folks are afraid to change the password for fear of breaking something
Maintenance can be a nightmare, it’s yet another stop on the “disable access” checklist when someone leaves a company
Active Directory/Azure Active Directory
Active directory (on-prem based) or Azure active directory (cloud based) is sometimes referred to as Windows Authentication, because this type of credential is needed to log into a machine, whether it be a laptop, desktop, server, or environment like a network, and it exists outside of the database.
Pros
Usually a bit more secure, since accounts are usually associated with an actual person, so passwords aren’t passed around
Usually requires interactivity (see next Pro)
A “Service Account” can be created that is not associated with an actual person
Can be added to Active directory/Azure active directory security groups
Cons
Usually requires interactivity
Not supported by all applications, but it is supported in Power BI
Service Principal
This is by far the most secure authentication method. Service Principals are created as “app registrations” in Azure Active Directory, and by nature they are not interactive.
Pros
Most secure out of all methods listed
Require “tokens” to access applications
Allow you to go on vacation
Cons
Can be difficult to setup/configure
In most applications, Power BI included, the tokens have a very small window when they are valid (like, just an hour), which is excellent from a security perspective, but bad from an automation perspective
Summary
Which would I use? Well, it depends. What are my client’s security requirements? Is Basic Authentication even an option? Some organizations have this disabled for their on-prem systems. If I go with Active Directory/Azure Active Directory, I would most likely use a “service account”, (where the password is stored in Key Vault) then I would use a PowerShell script to assign the credentials to the data source. Lastly there’s the Service Principal. My use of this would depend on how/when I am refreshing the dataset. If it’s at the end of an ETL/ELT process that can call PowerShell scripts and I know the dataset refresh time is less than an hour, then I would definitely use this authentication method with an additional call to get a fresh token just prior to issuing a dataset refresh. It can be difficult to choose which authentication method is best for you, but hopefully this post has helped at least a little bit.
I am so happy to announce that I have joined the team at Fortified Data. I have just completed my first week (well, four days) and I feel like I have found my work home. Everyone is so genuine and happy. It’s a nice breath of fresh air.
Fortified’s core values align with mine and I look forward to working with clients to create solutions that will enable them to be successful on their data journey.
My onboarding consisted of unique challenges that promoted teamwork, paperwork (of course!), and some unique experiences, including getting stuck in an elevator (not part of the actual onboarding, but we worked as a team to get unstuck), discovering an awesome French bakery, and going the wrong way on a one-way street (again, not part of the actual onboarding, but we worked as a team to get turned around).
Can’t wait to see what other unique experiences come next.
A little background for those new to using Power BI and Data Gateways. If the data source for your Power BI dataset lives on-prem or behind a private endpoint, you will need a Data Gateway to access the data. If you want to keep your data fresh (either using Direct Query or Import mode), but don’t want to rely on a specific user’s credentials (because we all want to go on vacation at some point), you will need to use a service principal for authentication.
The title of this post is something I have to do on a not so regular basis, so I always have to look it up because I inevitably forget a step. I decided to create a post about it, so I don’t have to look through pages of handwritten notes (yes, I still take handwritten notes!) or use my search engine of choice to jog my memory.
Add Service Principal as a user of the data source(s) in Data Gateway – this can be done in the Power BI service
Add Service Principal as an Administrator of the Data Gateway – this can be done in the Power BI service
Make Service Principal the owner of the dataset – this must be done via PowerShell
Bind the dataset to the Data Gateway data source(s) – this must be done via PowerShell
These are the high-level steps. If this is enough to get you started, you can stop reading now, but if you need more details for any step, keep reading.
Here are some prerequisites that I do not cover in this post. But I do provide some helpful links to get you started if needed.
Power BI Premium workspace (currently Service Principals only work with Power BI Premium or Embedded SKUs)
The Power BI Tenant Setting, Allow service principals to user Power BI APIs, must be enabled and the security group mentioned above must be specified in the list of specific security groups
The Power BI Tenant Setting, Allow service principals to use read-only admin APIs, must be enabled and the security group mentioned above must be specified in the list of specific security groups
This might seem like a LOT of prerequisites, and it is, but this scenario is typical in large enterprise environments. Now, on to the details for each step.
In my environment I have a service principal called Power-BI-Service-Principal-Demo that has been added to the security group called Power BI Apps. The Power BI Apps security group has been added to the tenant settings specified above.
Step 1 – Add Service Principal as a user of data source(s) in Data Gateway
This step requires no PowerShell! You can do this easily via the Power BI Service. Start by opening the Manage connections and gateways link from the Settings in the Power BI service.
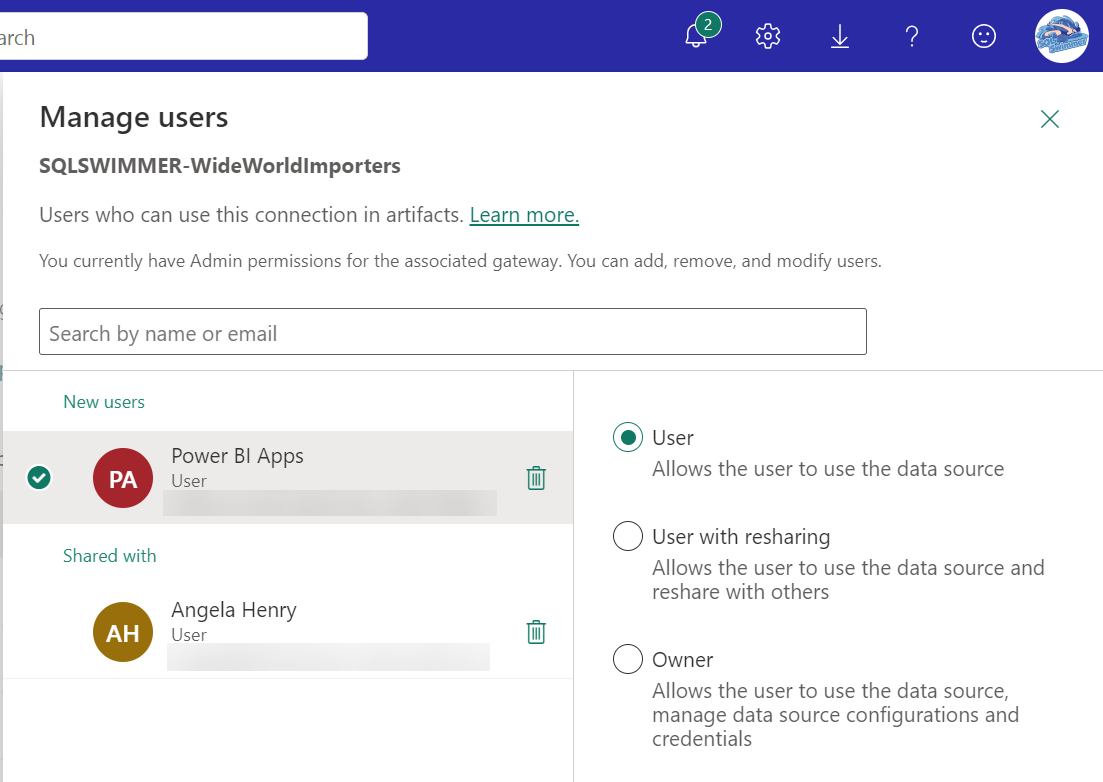
You will be presented with the Data (preview) window. Click on the ellipses for your data source and select Manage Users from the menu.
Search for your security group name (Power BI Apps for me) in the search box, then add it with the User permission on the right side. Click the Share button at the bottom to save your changes.
That’s it for step 1, super easy!
Step 2 – Add Service Principal as Administrator of Data Gateway
This step requires no PowerShell! This wasn’t always true, but it is now! You can do this easily via the Power BI Service. Start by opening the Manage connections and gateways link from the Settings in the Power BI service just like you did in Step 1.
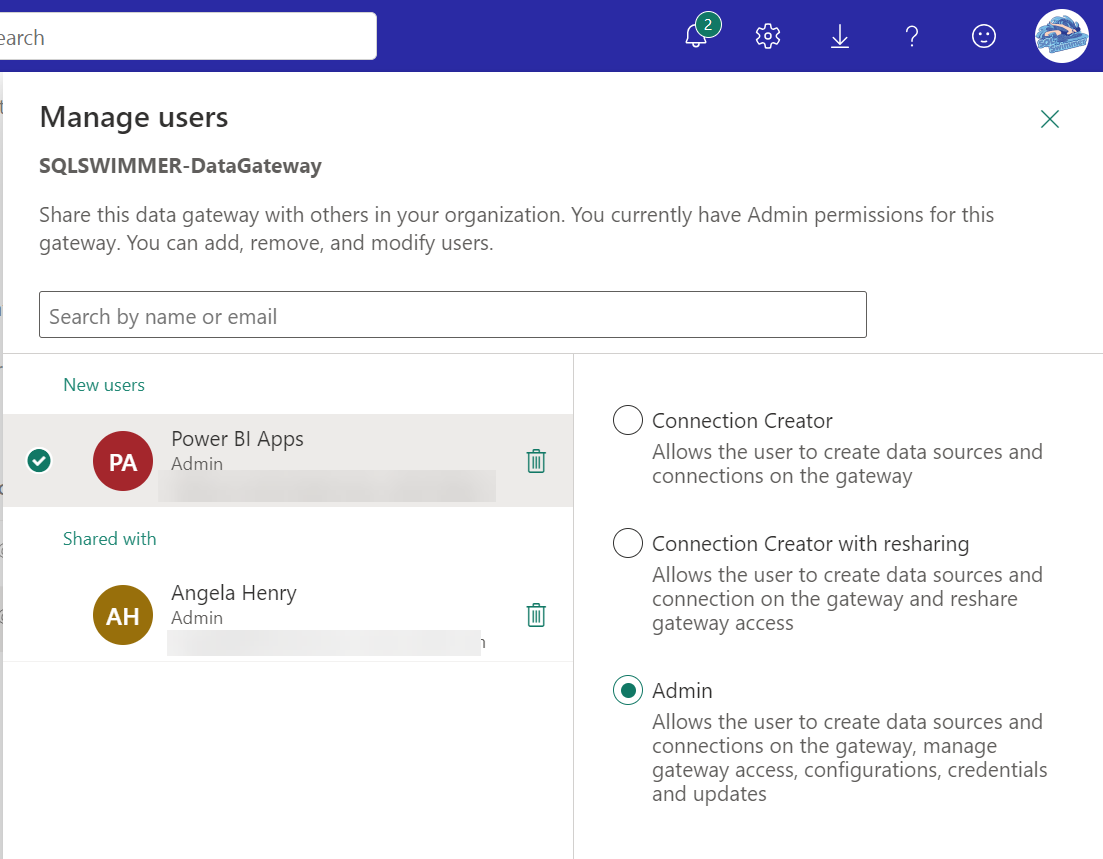
You will be presented with the Data (preview) window. Click on the On-Premises data gateways tab. Click on the ellipses for your gateway and select Manage Users from the menu.
Search for your security group name in the search box, then add it with the Admin permission on the right side. Click the Share button at the bottom to save your changes.
That’s it for Step 2.
Step 3 – Make Service Principal the owner of the dataset
In order for your dataset to be independent of a specific user’s credentials, we need to have the Service Principal take over ownership of the dataset. Normally taking over as owner of a dataset is a simple thing to do in the Power BI service, however it’s not so simple for the Service Principal. The reason for this is because in order to use the Take over button in the dataset settings, you must be logged in to the Power BI service and Service Principals cannot log into the Power BI service interactively, that’s the whole point. So, we must use PowerShell to make this happen. I have created a PowerShell script to do this and I do in combination with Step 4, below.
Step 4 – Bind the dataset to the Data Gateway data source(s)
There is no interface in the Power BI service that allows users to bind datasets that are owned by Service Principals to Data Gateway data sources. So, you guessed it (or you read short list of steps above), you have to use PowerShell to do it. I have combined Steps 3 and 4 into a single PowerShell script, which you can download from my GitHub repo. My PowerShell scripts assume that you have secrets in your Key Vault for the following values.
Service Principal App ID
Service Principal Secret Value
Service Principal Object ID
Power BI Gateway Cluster ID
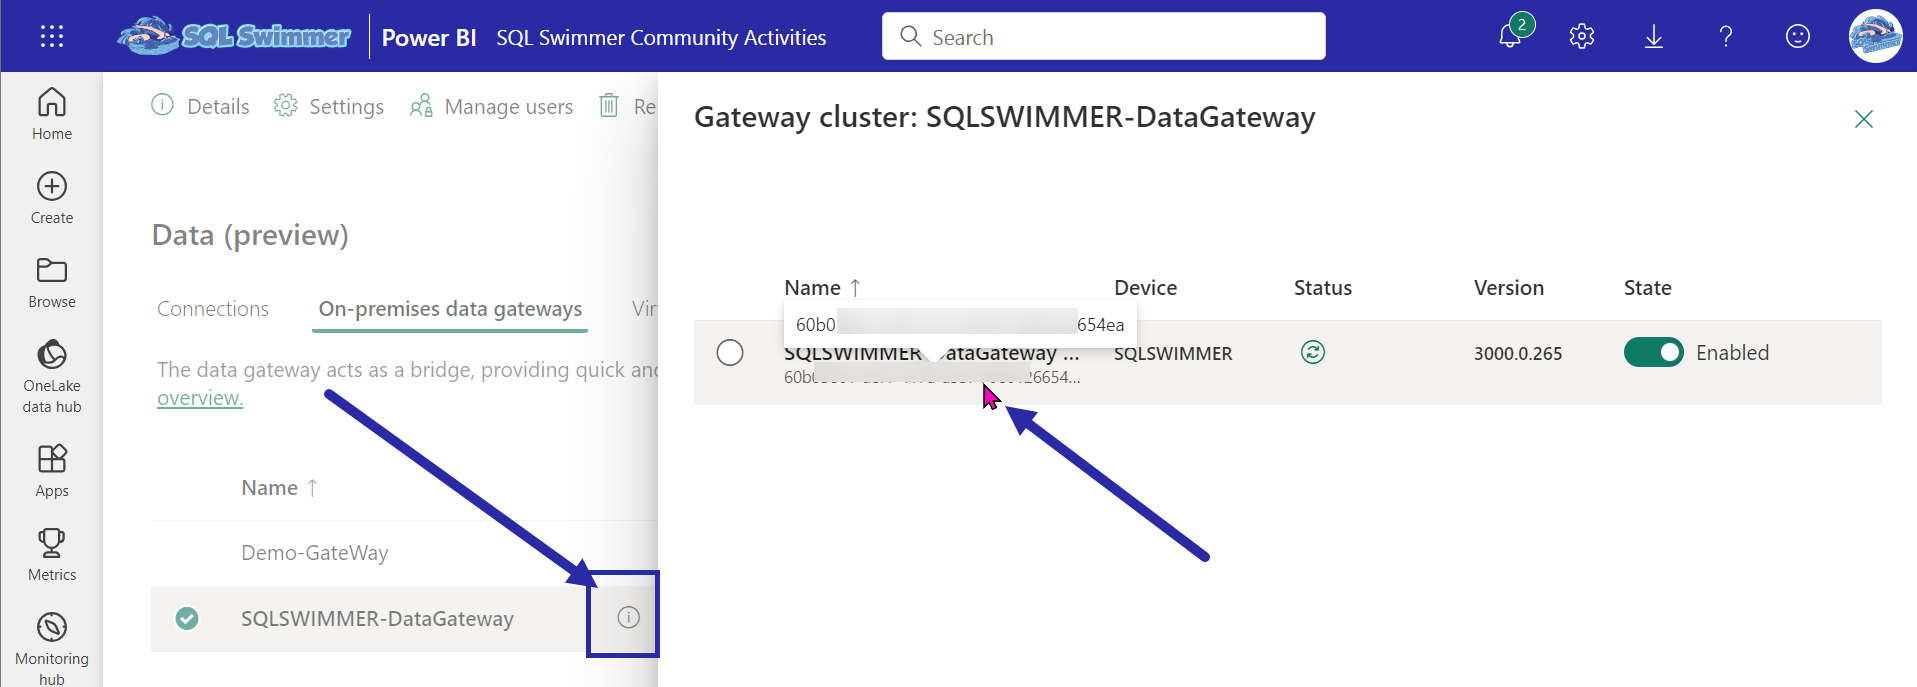
If you don’t have the secrets, you can always hard code your values in the scripts, though I wouldn’t recommend it. Those are sensitive values, which is why we store them in Key Vault. If you are unsure about how to get any of these values, this post should help you out for the Service Principal values and you can get your Power BI Gateway Cluster ID from the Data (preview) screen accessed by Manage connections and gateways menu option. It’s not super obvious, but you can click the little “i” in a circle for your gateway to get your Cluster ID.
In addition to these key vault values, you will also need
DatasetID
WorkspaceID
Name of your Key Vault
Your Azure tenant ID
Your subscription ID where your Key Vault resides
You will also need the data source ID(s) from the Data Gateway. Lucky for you I created a script that will get a list of those for you. You’re welcome. The GetGatewayDatasources.ps1 script will return a json payload, the ID of your data source is in the id node. Be sure to pick the correct entry based on the name node.
You are now ready to use the PowerShell script, TakeOverDatasetAndAssignSPtoGatewayDataSource.ps1, to finish off Steps 3 and 4. Here is a screenshot of the PowerShell code, you can download a copy of the code from my GitHub Repo. You need to provide the parameters based on the list above, modify values you use for your secret names in Key Vault, and provide your Gateway data source ID(s) and you are all set.
I couldn’t have done this without the help of these resources. I have essentially combined them in this post to make it easier for me to remember what I need to do.
Some of you may know that I went to work for BlueGranite a little over four years ago. It was humbling to be part of such a talented team there, leadership included. BlueGranite was very client centric and truly valued working with clients to create the best solution.
Last year, BlueGranite was acquired by 3Cloud Solutions. We went from less than 80 people in a very flat structure to over 700 people and 7 layers of management overnight, this was a difficult transition for me for many reasons.
I thoroughly enjoyed being part of BlueGranite, but the company culture at 3Cloud is different. It’s not bad or good, it’s just not for me.
So, after almost a year I have decided to start a new adventure. Today is my last day with 3Cloud and I wish those at 3Cloud all the best.
I am excited to announce that I have been selected to speak for the Future Data Driven Summit 2023. This is a free online conference, on Wednesday, 27-September-2023, for data folks focusing on the Microsoft Data Stack.
I will be delivering my new Getting Started With Governance For Your Power BI Estate session. This is a new session, and super excited to be able to deliver this.
There is still time to register for this event. Did I mention it’s free? What are you waiting for, go register and I’ll see you on the 27th.
I am super excited to announce that I have been selected to speak at SQL Server Live! in Orlando in November. I have selected to present two sessions, which are completely new.
While this is super exciting, it’s also bittersweet. This will be the first time in over 15 years that I have not attended PASS Data Community Summit, because Live! 360 runs the same week. It was a tough decision for me, but due to my recent physical limitations, I decided to opt for Live! 360 because travel will be significantly easier (and honestly, the weather in Orlando in November is much better than Seattle in November).
Please stop by and say, “Hi” if you’re in Orlando, I’d love see you.
I am saddened to report that I will not be able to attend SQLBits in person this year as originally planned. I was involved in a terrible car accident on 9-February, that has left me (hopefully) temporarily immobile and unable to travel for 3-6 months. I am on the road to recovery, but it will be a very long road.
This makes me sad for so many reasons. I will miss:
All the hugs from my #SQLFamily
All those smiling faces of delegates
The excitement that comes with travel
The anticipation of presenting live and in-person
Pub Quiz night
Fancy dress party night
Catching up with all my #SQLFamily
Impromptu conversations over hot chocolate or beers
The most excellent organizers of SQLBits have been amazing and have accommodated my request to present remotely on very short notice, so I will still get to present my session, it will just be from my bed, instead of in-person. While I will miss the (famous) Fancy Dress party, I will be wearing my costume during my session, but you have to attend my session to see it (not even going to give any hints as to what it is!) There may even be a prize for who guesses correctly.
Super excited that I was selected to speak at SQLBits 2023. The conference is taking place 14-18 March 2023 in Wales. I have never been to Wales and am really looking forward to it. The conference will be a hybrid event, just like in 2022, so if you aren’t able to travel, you can always attend virtually.